Showing posts with label baking. Show all posts

Challah

Several weeks ago, found us with pullets up to almost full-size laying, and waaay too many eggs in the fridge. I decided to try my hand at an egg-heavy baking venture. After looking at a few different recipes (and deciding that we probably would never eat that much pound cake if I froze a bunch...) I settled on Challah bread. It's yummy, and uses quite a few eggs....unfortunately, it also looks a bit...ahem..intensive...and no, I have no family recipe to go on. Instead, I borrowed someone else's. An expert, Smitten Kitchen. :-)

Her recipe pretty much says it all, and really did make for a pretty easy experience.  I don't have any pics of the dough, but S. was kind enough to get my attempts at following Smitten Kitchen's braiding directions burned into monitors everywhere. :-) I gave up on the directions (sorry!) and just stuck to what I know, which is a fairly straightforward multi-strand braid....take the right-most and alternate over-under-over, then take the new right-most and repeat. Not authentic, I'm sure....but it looks much more presentable than my earlier attempts.


After braiding, I brushed both loaves with lots and lots of egg yolk....
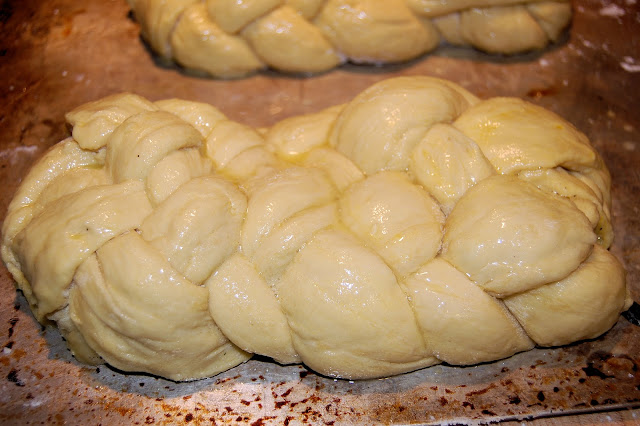

Then into the oven. The loaves did take a bit longer to bake then the instructions said...but I used the internal temperature guidelines...and that worked out great! We ate one loaf right away, and froze the other one for later. This was very yummy---it took a while, with all the risings, but I'll definitely make it again...

Lazy August

So, despite my lack of posts in August, we actually were pretty busy. We froze some green beans, made relish, baked Challah bread to use up some eggs,grilled tons more of those scalloped summer squash, and brought in our biggest crop of carrots yet (we've never really been great at growing carrots). So why no word of these things? Ummmm...they're coming. I promise!

In the meantime, how about some more pictures of our lovely laying hens dust bathing? :-)
....and of course, Roscoe the rooster.

Tomatoes in Muffins


I love making muffins. They're so forgiving. You start with a sweet base or a savory base and just add what you like---the only thing you need to remember is to keep the correct wet/dry balance...then you just lump them in the muffin tins and cook them for 20 or so minutes and there you have it. Pretty hard to miss your mark with simplicity like that.

The recipe that I usually use came originally from Joy of Cooking, but I've modified it slightly to suit my purposes. I made some delicious muffins this past weekend using some of our garden-grown tomatoes as add-ins (this of course adjusted my liquid amount a little bit, as they were rather juicy). The original recipe is great with any sort of savory seasonings. A regular of mine is cheddar cheese and chives, I've also made sun-dried tomato muffins a few times...whatever suits your fancy. (I'll include the changes to my usual recipe in blue--since I had to change the liquid amount a little bit for this particular variation.)


Tomato Muffins
I have super-large muffin tins that are about twice as big as regular ones--this recipe made two big tins and one regular...so my guess is that it would make about 30 regular-sized muffins.

Ingredients:
7 cups flour
4 tbsp baking powder
4 tbsp sugar
2 tsp salt (I usually use about half to three-quarters of this amount)
4 eggs
4 cups milk (this tomato recipe added liquid from the tomatoes, so I only used 3 and a half cups of milk)
12 tbsp melted butter (that's 1 and a half sticks)
several tbsp mixed italian seasoning (I didn't measure, I just sprinkled it in until I saw lots of green flecks in the flour mix...)
1 tsp oregano
1/3 cup grated romano cheese
(also a healthy dash of grated parmesan)
4 med-small tomatoes, diced -- and their juice (about a half cup of liquid)


Preheat oven to 400 degrees Fahrenheit. Mix dry ingredients together (I rarely sift, but feel free if you prefer)--that's the flour, sugar, salt, baking powder, and any dry herbs/seasonings or cheese (in this case, add the orgeano, italian seasoning, and two types of cheese here).

Dry ingredients

Melt the butter over low heat, being careful not to cook it too l0ng or solids will develop. Break eggs into separate bowl (break the yolks) and combine them with the other wet ingredients---that's the butter, milk, and any wet flavorings (this is where I added the tomatoes).

Wet ingredients

Then, combine wet and dry ingredients (stir as little as possible as more stirring causes the muffins to be too glutinous..) It's supposed to be lumpy---just make sure you get any pockets of the dry ingredients or flour lumps out.

Combined wet and dry ingredients--note the jagged lumps.
(This dough is a little overly moist, but it came out great.
)

Fill well-greased muffin tins 3/4 full with batter (I don't use liners since I find that the muffins really rarely stick when you grease the tins well enough), and place in oven.

Muffins in the oven

Bake 20-30 minutes (at 20 minutes take them out and use a clean knife or toothpick to check for doneness...) They should only get very slightly brown on top---not very much at all. If they are starting to brown a lot they're probably done! (For these muffins, the recipe made two large tins and one regular. The regular-sized muffins --conincidentally on the baking stone that we left in the oven...oops... and one tin of large ones that were on the bottom rack, were done in 20 minutes. The other large tin on the bottom rack needed another 7 minutes.)

Here are the two sizes of muffin tin--on top is regular-sized, on the bottom are the huge ones. I love the huge muffin tins...how can you not like something that gives you more home-baked muffin goodness?
Oh, and the comments are working!

pizzaclose
Homemade pizza with sun-dried tomatoes and prosciutto

For a while now, S. and I have been making our own pizzas for dinner on friday nights. They are absolutely delicious---and I love the different variations that we've tried. We've used, prosciutto, pepperoni, bell pepper, eggplant, sun-dried tomatoes, zucchini, pecorino romano, parmesan, mozzarella...yum.

So how did this all get started, you ask? Well one day I was surfing the web and I found this blog. And then I read it for a bit and happened upon this recipe. That looks easy enough, I thought. And so we made these (that was a much shorter explanation than you thought, wasn't it? But wait--there's more***...):

calzones
Yum---homemade calzones oozing cheese.

We only used the crust recipe, not the filling. That was ages ago, but I believe we just filled with cheese, sauce, and maybe pepperoni...I don't even remember, but it was yummy! (Slash the top a little bit to keep the sides from oozing as much, and if you wet the dough before folding the seams that helps too....)

And then one day we decided to make pizza.....but all of the recipes for dough required a much longer rise time then we wanted to wait (being hungry and inpatient and all)....so I remembered that crust. With only a 15-20 minute rest period and part whole wheat dough, it's fast and always comes out the right texture. It's not thin crust, and it's not super chewy, but it stays just soft enough every time (with a little extra flour, a little extra water, some seasoning tweaks...you know: artistic license). Ever since then we've tried to have our pizza fridays. We double the amounts in the recipe so we have enough for two pizzas, so we split the dough in half and keep the second half in the fridge in a bag for the following week. But seriously, I can't take too much credit--S. is the pizza dough maker extraordinaire.

DSC_0654
Putting the toppings on--don't forget to put cornmeal on your pizza peel

Then just roll out the dough, put it on your pizza stone, top it as you like and stick it in a 450 Fahrenheit oven until it smells amazing and you can't wait for dinner any more (ok maybe like 10-15 min...I never actually timed it. We usually just go have a glass of wine while we're waiting.) Don't forget to let it sit a bit to cool or else you'll burn your tongue (speaking from experience here.) Happy pizza!

pizzaclose

Now if you'll excuse me, we're making a margherita pizza right now :-)

Adventures in Pita


Earlier this year I happened upon a few recipes that piqued my interest. I'm going to be sprinkling posts on them in here from time to time as I have a moment so that I can share them (I don't do the cooking but I do love to bake). =) The first up is a wonderful recipe for pita bread. The pita bread was tons of fun to make---although it was definitely a little bit time consuming since S. and I tried to bake them on individual foil pieces--and we couldn't fit more than maybe two at once in the oven! (Also a warning: the pita will not last long once it's out of the oven. We had eaten it all in, I think, two days---and the only reason it took two is because we were stuffed on humus.)

Rolling out the pita dough

The pitas puffing in the oven

Yum--pitas are done

We didn't have great luck with the puffing part of the process--although it was really very cool to watch them puff (even asymmetrically) in the oven---like magic! No point in re-posting the recipe--I used Foodie Farmgirl's pita recipe (which I was ogling for some time). She also has some great tips for getting them to puff (although ours came out with mixed results...but who cares? Flat or not, I'll never look at pita the same way again!)

We made our own hummus at the same time (toasted the sesame seeds and everything). I printed out the recipe from a website (but I don't remember which one!) Will link or post when I find it). My only complaint with that is we couldn't quite get the seasoning perfect--tried adding more salt, some more lemon juice, some garlic powder, etc etc---but as good as it was, it was still a teensy bit bland. Maybe I'll come across the perfect hummus recipe sometime and try it again (and I definitely want to make roasted eggplant dip with eggplants from our garden later in the year!)
Related Posts with Thumbnails