I wish WaPo had written their corn article several weeks earlier---look what I found. A recipe for using the leftover husks, silk and cobs to make sweet corn-tasting broth which can then be frozen or refrigerated.
....pretty cool stuff...
Of course, we already froze all of the corn we had, and used the husks for mulch. Oh well, there's always next year....If anyone tries it let me know how it is!
July 31, 2009
July 29, 2009
The Beauty of Butterfly Bushes

 Some sort of swallowtail, perhaps. The Spicebush Swallowtail looks closest.
 I'm not sure what this one is....maybe some sort of hairstreak or skipper?
 This is a White Cabbage butterfly (I think)---the danged caterpillars eat our kale, broccoli, and radishes,
July 28, 2009
Why we need a freezer (redux)
I love our grocery store. Feeling green-bean deprived S. went to the produce section to pick up a few extra for freezing. he came back with this:
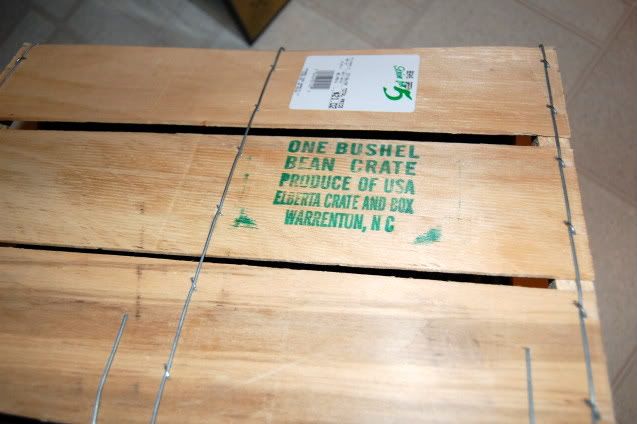
That sticker says the box contains 21lbs of green beans folk. Yikes.
Well, I figured we could freeze some, and make dilly beans out of the rest. Turns out to make a dent in the box we're going to have to make a sextupled dilly beans recipe. Needless to say, I needed to run to the grocery store to pick up some more ingredients....so we separated out enough beans for that -- 12lbs) and froze the rest.
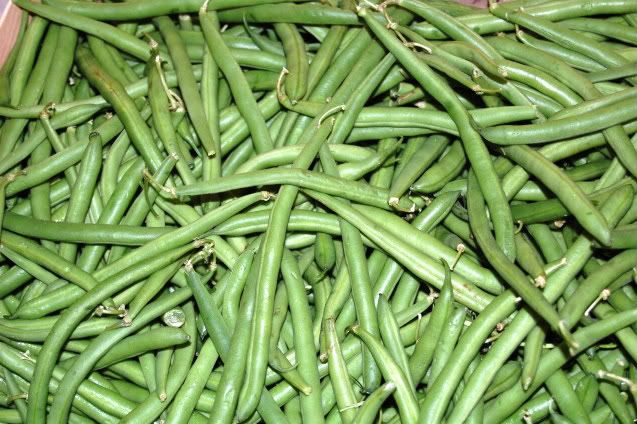
We washed 'em, snapped 'em, and tossed 'em in boiling water (our instructions said to blanch for 2 minutes, so I timed it).
 In boiling water.
Then we pulled them out of the water with a slotted spoon, and put them in a colander over ice. We also hit 'em with some more cold water to stop the cooking process. (They had turned nice and bright green in the boiling water)
 Over ice.
Then we patted them dry on a dishtowel, before putting them in freezer bags.
 We dried them briefly on a towel.
All in all, we have 4 and a half gallon bags of newly-frozen green beans.
 The beans in the freezer.
And 12 more pounds waiting to be canned---that should make 12 quarts of dilly beans if the recipe goes as planned (we'll be using quarts since the green beans are so long--we would've had to break them in half in order to use pints). I'm excited, since I've never made or had dilly beans before---but I've heard good things about them. :-)
That sticker says the box contains 21lbs of green beans folk. Yikes.
Well, I figured we could freeze some, and make dilly beans out of the rest. Turns out to make a dent in the box we're going to have to make a sextupled dilly beans recipe. Needless to say, I needed to run to the grocery store to pick up some more ingredients....so we separated out enough beans for that -- 12lbs) and froze the rest.
We washed 'em, snapped 'em, and tossed 'em in boiling water (our instructions said to blanch for 2 minutes, so I timed it).
In boiling water.Then we pulled them out of the water with a slotted spoon, and put them in a colander over ice. We also hit 'em with some more cold water to stop the cooking process. (They had turned nice and bright green in the boiling water)
Over ice.Then we patted them dry on a dishtowel, before putting them in freezer bags.
We dried them briefly on a towel.All in all, we have 4 and a half gallon bags of newly-frozen green beans.
The beans in the freezer.And 12 more pounds waiting to be canned---that should make 12 quarts of dilly beans if the recipe goes as planned (we'll be using quarts since the green beans are so long--we would've had to break them in half in order to use pints). I'm excited, since I've never made or had dilly beans before---but I've heard good things about them. :-)
July 24, 2009
Pizza Friday - homegrown
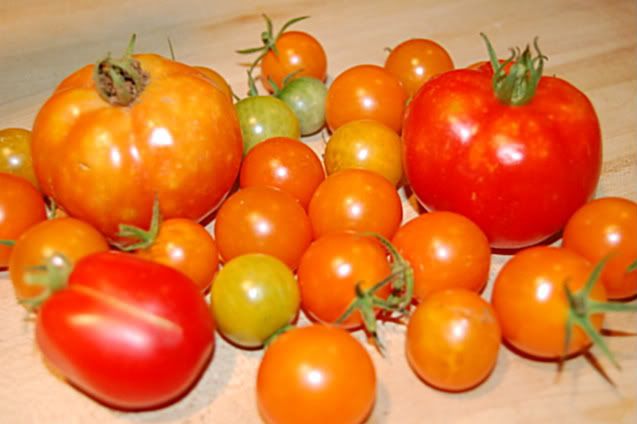
We had enough ripe tomatoes today that we thought they'd go well on a pizza...so we picked them (the green ones in the picture fell off the plant--they're going on a windowsill to ripen), and a bunch of basil.

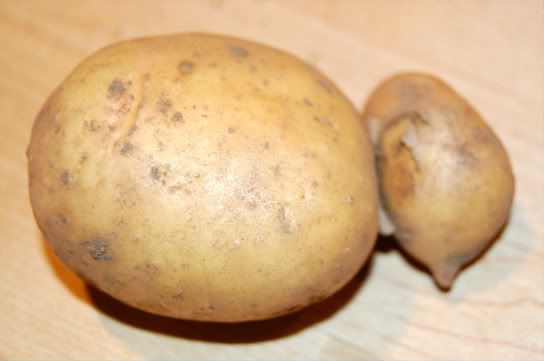
Our potato plants all died from some sort of wilt or blight (I suspect late blight), but S. dug around to see if we had any potatoes....he found some! Does anyone know if they'll keep getting larger after the plant has died back? I suspect not, but want to be sure before we dig 'em all up.
Tomatoes that we picked today
(a Roma, several Early Girls, and a bunch of Sungold cherries)
(a Roma, several Early Girls, and a bunch of Sungold cherries)
Tomato (Sungolds and the Roma) and basil on top of pizza.--
the best pizza so far, I think (the pink/brown is prosciutto)
the best pizza so far, I think (the pink/brown is prosciutto)
Our potato plants all died from some sort of wilt or blight (I suspect late blight), but S. dug around to see if we had any potatoes....he found some! Does anyone know if they'll keep getting larger after the plant has died back? I suspect not, but want to be sure before we dig 'em all up.
Potatoes that S. dug up
July 23, 2009
Yum--more Sungolds!
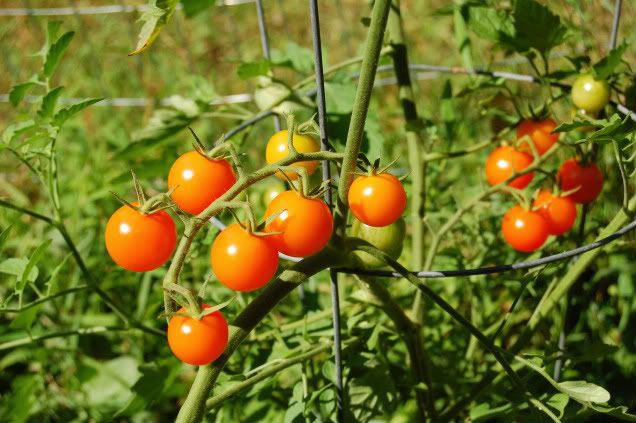 We have more Sungold cherry tomatoes ripening.
These are seriously some of the most delicious cherry tomatoes we have ever grown. I think we're definitely going to have to grow them again next year.
July 21, 2009
About those beans...

Could it be a wilt?
Could it be nematodes?
Whatever it is, all of our beans have been affected. The leaves turn yellow and brown, then die. The beans aren't developing fully, and then they just wither on the plant.
We did manage to get a few handfuls of snap beans, and this small pile of Jacob's Cattle beans, however.

July 19, 2009
Great Expectations
This part of the year is second-hardest** for me garden-wise. It's so full of potential it drives me crazy. The peas and lettuce are all done, the broccoli is long pulled up, and the first tomato has been picked. But most things in our garden are still in their blooming phase. We have peppers and tomatoes that are still days, perhaps weeks from ripening in any quantity and it really tries a hungry gardener's patience!
**The hardest time for me in the garden is early early spring--March and early April when the winter seems to last forever
 There are tons of green tomatoes
 Squash flowers--but only flowers so far!
 The eggplant is getting bigger, but not ready yet
 Cucumber flowers and twining vines
It's hard to wait patiently for everything to set fruit and ripen...it's july and I always feel that harvest should be in full swing (of course it never quite is 'til August...but you know)
Maybe it'd be easier to wait if our beans (all 4 varieties of them--although the Blue Coco are the least effected) hadn't been stricken down by something...Is it a nutrient deficiency? A disease? There aren't all that many insect holes so I doubt it's that.....What then?
**The hardest time for me in the garden is early early spring--March and early April when the winter seems to last forever
There are tons of green tomatoes Squash flowers--but only flowers so far!The eggplant is getting bigger, but not ready yet Cucumber flowers and twining vines It's hard to wait patiently for everything to set fruit and ripen...it's july and I always feel that harvest should be in full swing (of course it never quite is 'til August...but you know)
Maybe it'd be easier to wait if our beans (all 4 varieties of them--although the Blue Coco are the least effected) hadn't been stricken down by something...Is it a nutrient deficiency? A disease? There aren't all that many insect holes so I doubt it's that.....What then?
A quick note:
I've fixed the fuzzy photos in the Rosemary Balsamic Chicken post. When my free flickr space for this month ran out, I decided to try picasa and, evidently, I don't quite have the hang of it yet. The photos up there now use photobucket, which I found to be a bit more user friendly. Sorry about that! (I don't know about you, but they gave me a headache every time I looked at them...)
:-)
:-)
July 18, 2009
Freezing Wineberries
A comment on my wineberry jam post recently brought wineberries back to the forefront of my mind. I realized that I never followed up on what we did with the rest of them. We actually didn't use all of the wineberries in the jam, and picked even more the following weekend. Thinking that they would be nice for a holiday or winter-time dessert, I froze them.
It's really easy to freeze berries. You just spread them out flat on a tray and stick them in the freezer overnight ( our were in there for a day or two).
 Here they are after I pulled them out of the freezer.
Then you just put them all into a freezer bag.
 Taking the frozen berries off the tray
The above picture is the batch we picked the next weekend. They were a bit riper and juicier so stuck to the tray more. I found that a spatula worked really well to scrape this batch off the tray without damaging them to much. The first batch was pretty easy to just loosen with your fingers.
 The bag of frozen berries.
Remember to label the bag before it's cold. That's what happened here--I froze them in two batches so when I pulled the bag out to add the second batch a bit of condestaion started to develop---making it a little tricky for the marker. Ooops. :-)
It's really easy to freeze berries. You just spread them out flat on a tray and stick them in the freezer overnight ( our were in there for a day or two).
Here they are after I pulled them out of the freezer.Then you just put them all into a freezer bag.
Taking the frozen berries off the trayThe above picture is the batch we picked the next weekend. They were a bit riper and juicier so stuck to the tray more. I found that a spatula worked really well to scrape this batch off the tray without damaging them to much. The first batch was pretty easy to just loosen with your fingers.
The bag of frozen berries.Remember to label the bag before it's cold. That's what happened here--I froze them in two batches so when I pulled the bag out to add the second batch a bit of condestaion started to develop---making it a little tricky for the marker. Ooops. :-)
July 16, 2009
Chicken Coop
I think they like it....
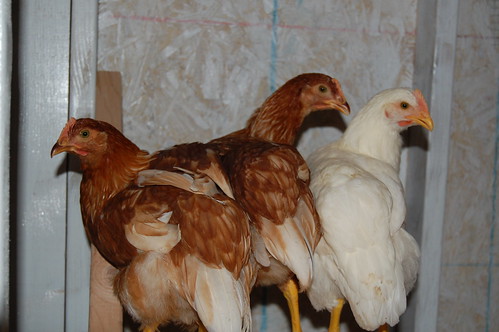
After consulting with a message board of experts, the jury is in. Looks like we have three white rocks and three red stars (or red sex-linked). Thanks guys!
Chickens on roost
After consulting with a message board of experts, the jury is in. Looks like we have three white rocks and three red stars (or red sex-linked). Thanks guys!
July 15, 2009
Rosemary Balsamic Chicken Kabobs
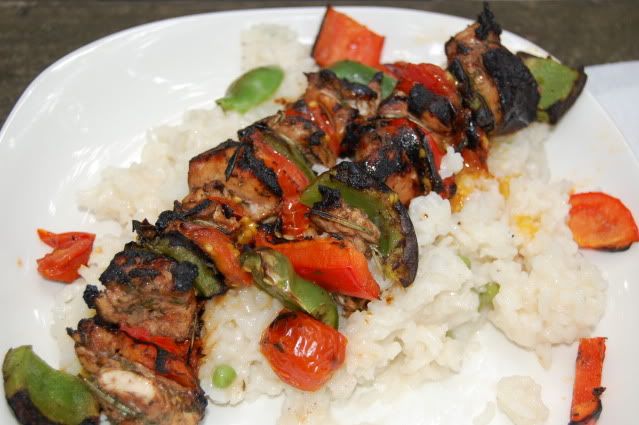
We usually fire up the charcoal grill on Sundays, so last Sunday, S. asked me what I would like grilled---I said maybe chicken. We had a ton of seafood on the 4th, so neither of us felt much like that...and we had been out to eat the night before and both had red meat...so neither of us felt much like that...chicken kabobs sounded like a good option. We happened to be in the grocery store at the time, so when he asked if I had any particular flavoring in mind, so I glanced over and saw a bottle of rosemary balsamic marinade. That works. Kinda sounded good, actually. And this was born (and is it good....):
Rosemary Balsamic Chicken Kabobs:
(Makes 4 13-inch kabobs)
(consider yourself warned: S. cooks in pinches and dollops and dashes...)
marinade:
2 chicken breasts, cut into kabob-sized pieces
3 tbsp balsamic vinegar (S. says that balsamic vinegar has a very strong flavor that can easily overpower your food--so be careful not to use too much...)
1/2 cup white wine
large pinch garlic powder
large pinch parsley
2 dashes Worcestershire sauce
large pinch rosemary (crumbled--we dried it ourselves so it was in whole needles)
dash olive oil
kabobs:
veggies of your choosing, the below is what we used...
1 carton cherry tomatoes
1 red bell pepper
1 green bell pepper
Combine all marinade ingredients in container large enough to cover chicken pieces. After putting the chicken in the marinade, ensure that it is all covered--if not, add more white wine and olive oil, and cover the container---place in refrigerator. (We marinated it for about 2 hours...just because that happened to be convenient for us)
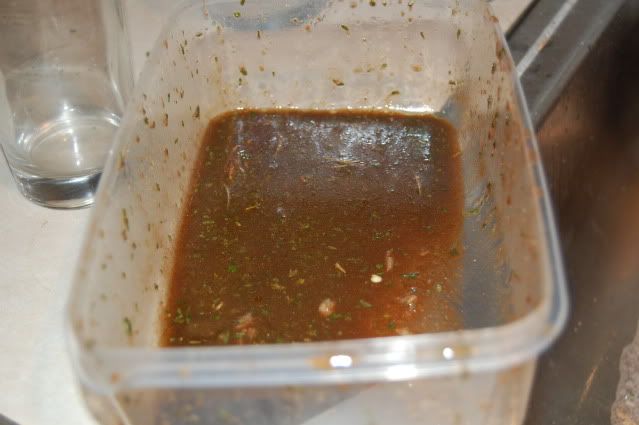 The marinade
If you have a charcoal grill, like us, remember to light it in plenty of time for grilling--S. usually lights the grill about an hour ahead of time to let it heat up. We also had this over yummy basmati rice--S. says he added a little garlic powder, worcestershire sauce, liquid smoke, and some frozen peas to it--gave it a very subtle flavor.
Once you're all set with your grill, go ahead and start threading the kabobs.
 Kabobs ready to go on the grill
Then, just put 'em on the grill. These took about 15 minutes on ours...but be sure to check the meat temperature if you're not sure...raw chicken is no fun.
July 14, 2009
A nice day for a swim...
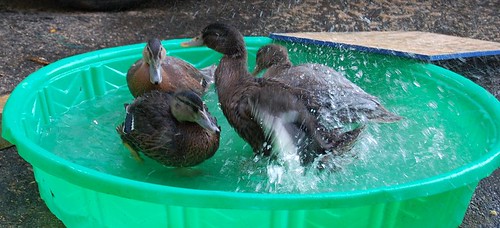
83 degrees..you know that feels good :-)
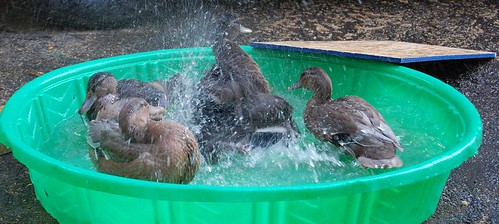

...and the after-preen
There's nothing like a refreshing dip...looks like July is here!
July 12, 2009
First Blueberry
You may recall that way back in April we planted 3 blueberry bushes. Well, today while mowing the lawn, S. spotted the first blueberry---ripe. (It was delicious and it looks like we'll get at least a few more this year.)

First blueberry
July 11, 2009
First Tomato
Ah, our first tomato of the year. It's a Sungold cherry tomato, (behind it are blue lake, potomac and blue coco----those are the purple ones---snap beans). Since we got our tomatoes in a little late this year, due to first a delay in tilling, and then a delay due to the really wet spring, it's a little later then I would have preferred. The good new is that there are quite a few tomatoes set on the vines--nothing but the cherries are ripening yet, but they will be soon!
 Our first tomato of the year--a 'Sungold'
I offered half of this first tomato to S. but he declined so I had the first taste test. I only asked twice...no need to convince me to eat the whole thing myself :-) we've never grown this variety before, so I found it very interesting tasting. Apparently they're ripe at this orangey-red color, and it really tasted much sweeter than I expected. Almost a slight citrus or pineapple flavor to it, really.
Here's hoping for more soon!
July 10, 2009
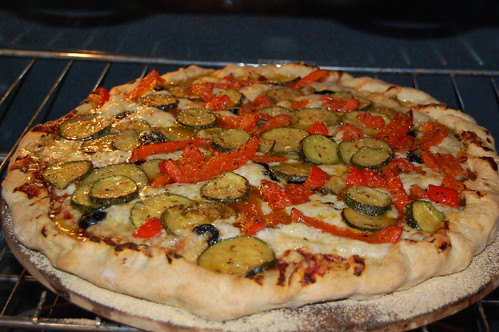
Pizza friday--a summer pie
Zucchini, olives and bell peppers:
Oh, and were you wondering what we did with all of those corn husks? We mulched part of the herb garden!
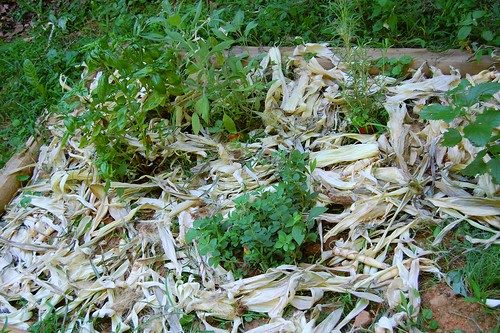
That's the basil and sage on the left, and the oregano in the foreground, rosemary at the center top, and lemon balm at the far right (oh, and chives at the bottom right corner)
Oh, and were you wondering what we did with all of those corn husks? We mulched part of the herb garden!
That's the basil and sage on the left, and the oregano in the foreground, rosemary at the center top, and lemon balm at the far right (oh, and chives at the bottom right corner)
July 9, 2009
Fajitas!
Last Thursday (I know, a whole week ago? What's wrong with me?) we made some yummy fajitas that I wanted to share. During the week we usually make meatless meals, which can mean tofu, seitan, tempeh, or other various meat substitutes. These fajitas use a ground beef substitute--I can't remember the name of it just now, but it basically means add Worcestershire saue and liquid smoke. Seasonings aren't included in this post, 'cause I can't keep up with S's fast hands....he's the executor behind the meal, although fajitas were my idea :-)


Try it some time! With either beef or imitation meat, it'd be yummy, I'm sure.
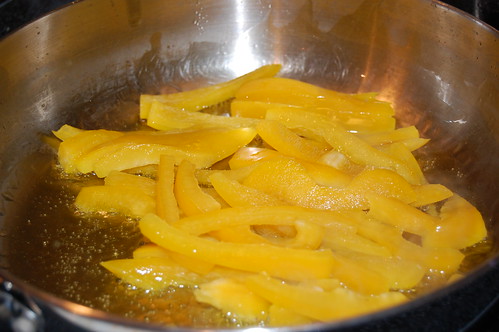
First he chopped some peppers, and sauteed them
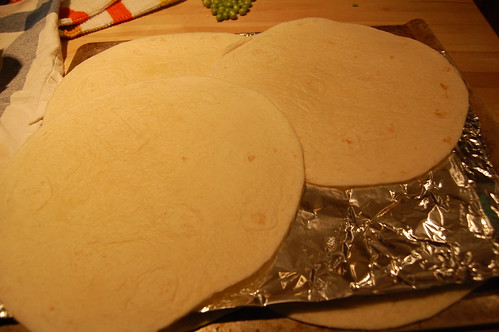
Meanwhile I got some tortillas ready to warm in the oven
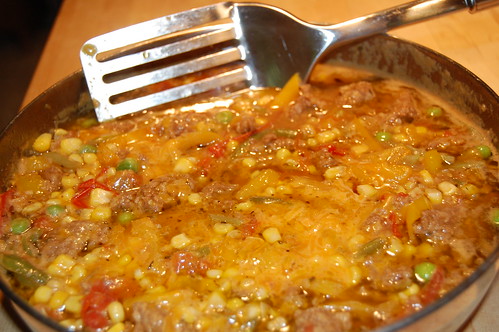
Then came the ground meat substitute (and seasonings..my apologies, I couldn't catch them all. I definitely spotted Worcestershire sauce on the counter later, though...but knowing him that probably means garlic powder and maybe even dried minced onion)
Some garden peas, tomatoes, corn, beer and cheese got added to the mix too...
Then we cooked it down for a bit until it thickened up...
Then we cooked it down for a bit until it thickened up...
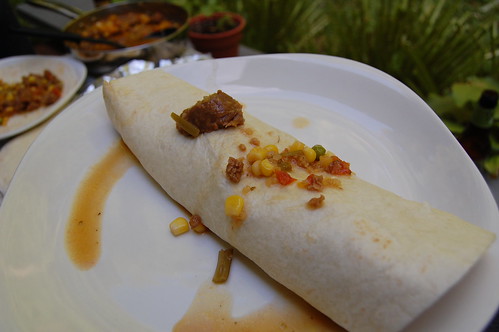
Then we put the whole mess on tortillas....
And voila! I know, it needs a garnish--our parsley died, so sorry about that :-)
Try it some time! With either beef or imitation meat, it'd be yummy, I'm sure.
July 8, 2009
Why we need a freezer...
When we had my parents over for the 4th of July, we had shrimp, clams, portabella mushrooms, potato salad, bean salad (that they brought) and grilled corn. By the time we got to eating the corn, everyone was stuffed (and forget the pound cake that we had for dessert...that just wasn't happening.) Luckily we had only grilled a few ears--6 or so and it wasn't a huge deal.
The huge deal was the remaining 31 ears in a crate in our mudroom....Yes, folks, we got a great deal at the grocery store on friday....one that we just couldn't pass up...$12 for 48 ears of corn, that is...and THAT is why we need a freezer. We usually cook with frozen corn in the winter, so why not, faced with a deal such as this.....freeze our own? Our trusty copy of "How to Store your Garden Produce" by Piers Warren in hand, we looked it up. Blanching. Aha. Ok then. Here we go:

First we shucked all of the corn. (Here's S.)

Here it all is, fully shucked.
The corn that we use over the winter is dekerneled (is that even a word?)...so we decided it would be more useful to preserve them that way. That was the next step, taking the kernels off of 31 ears of corn (yes, I counted.) S. got really close to the cob when he did this so we got tons of corn off of the ears.
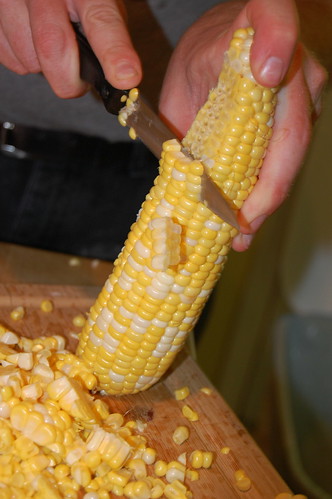
S. removed the kernels
The next step was to blanch the corn. This is done to preserve the sweetness and texture of the corn through the freezing process (someday maybe I'll experiment with the same batch of corn..some blanched, some not, to see if it really makes a difference.) Dekerneled corn only needs to be blanched for 1 minute--we did it in batches since we had so much corn.

Corn kernels blanching
After boiling them for 1 minute they got an ice water treatment to stop the cooking process.

The corn in ice.
Then we put them into freezer bags. 4 and a half gallon-sized bags later, we were done. Doesn't it look yummy to be frugal? This is much more corn for much less money than if we had just bought it frozen.
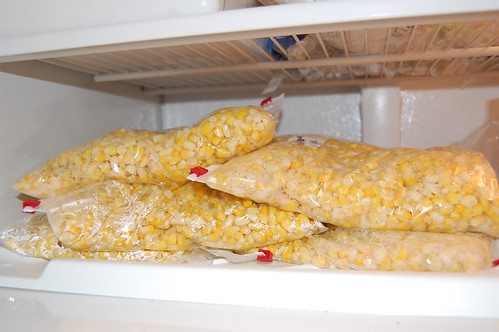
The corn in the freezer.
We've been talking about getting a chest freezer for a while now...at this rate we may want to consider it sooner rather than later.....
July 6, 2009
Wineberry Jam
First an update: the window is in on the chicken coop, and the ramp for the chickens is complete. It's all ship-shape and the only things left to do are roofing material and painting the outside. After that----the duck house! Although we were thinking of just using a large dogloo for them, it's looking like we will build a lean-to-like structure onto the side of the chicken coop for them. A "duck wing", if you will.
My parents came up for the 4th of July, and they were kind enough to lend their berry-picking expertise. We got, I would guess about 3 cups (or more) on Saturday with them. Then, today, S. and I went back out and picked some more. Now we had 3 large tupperware containers full of Wineberries (and one black raspberry). What to do what to do....well, we were originally going to make a pie or a tart but now we had way too many berries for that...so we settled on jam. (turns out we only used about half of the berries up for that too...since we could only find one box of pectin..)
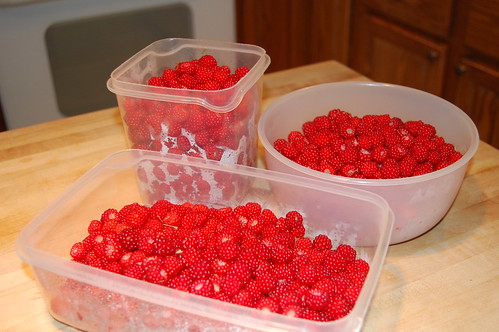
Wineberries from our yard.
We used the recipe in the package of pectin (as good as any) for "Blackberry, Boysenberry, Dewberry, Loganberry, Raspberry or Youngberry" jam, but there are copious notes and additional steps and edits, added in by yours truly. So really you can consider these steps based on the original recipe, but expanded upon considerably:
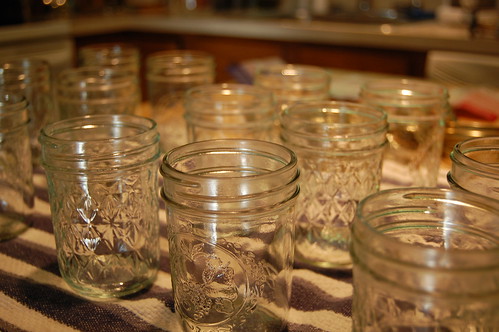
Approx. Yield: 8, 8-ounce jars--and we actually did get exactly 8 jelly jars full...but consider yourself warned that regardless of recipe specifications we always make sure there are plenty of extra clean jars on hand, just in case....
Ingredients:
8 cups crushed berries (2 quarts)
7 cups sugar
1 box pectin
1. Prepare boiling water canner, jars and lids
(We usually run our jars through the dishwasher ahead of time and have them at the ready. Most people recommend sterilizing your jars, bands, and lids ahead of time. Inspect your jar bands for rust and dents, and only use non-flawed and never-before-used dome lids. Caution: Always follow all instructions for safety that came with your jars, your lids, and your canner. You should only use a USDA recommended canning recipe. Use any canning recipe at your own risk, and if unsure, caqll an experienced canner or your cooperative extension for help. We usually begin our water bath canner boiling at this time now too, since it takes so long to get a rolling boil.)
Crushed wineberries.
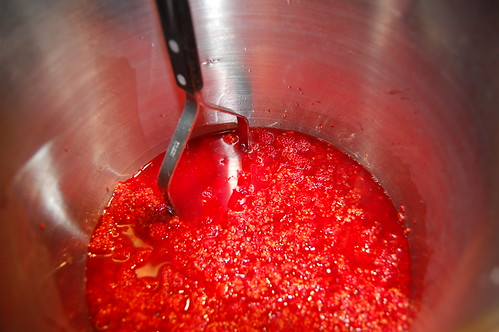
2. Place prepared (crushed berries) in a 6 or 8 quart stockpot (Consider yourself warned that we almost ALWAYS have our jam boil over or splash and it's hard to get the sticky stuff off the stove after it's cool) Do not complete the next step unless your canner is near to boiling. At this stage things can go very quickly and it's better to not have full jars waiting to be canned while you wait for it to reach a boil....this is speaking from experience.

Wineberries and pectin in pot on stove (not sure why the foam here is orange....).
3. Gradually stir in pectin and bring mixture to a full boil over light heat, stirring constantly (be careful of splashes and bubbles---it gets really hot!)
4. Add sugar, stirring to dissolve. Return mixture to full rolling boil. Boil hard for 1 minute (it WILL foam....don't get burned--be careful), stirring constantly. Remove from heat, skim off foam if there's a ton of it, otherwise let it be.
5. Ladle into jars, one at a time. Leave 1/4 inch headspace. Be sure to run a hot, damp paper towel around the rim after filling the jars. That will get the excess jam off and make sure that the lids seal properly. Then place the dome lids on top and screw on the bands to finger tight. Thump the bottoms of the jars lightly on the counter to get out extra bubbles.
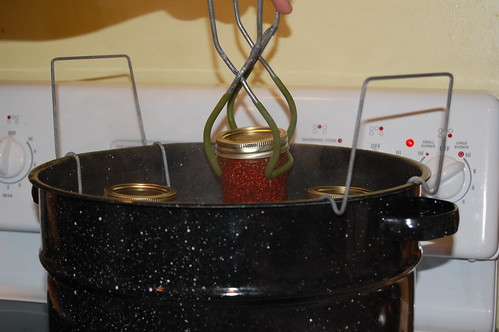
6. Place jars carefully into canning rack (in canner) using jar tongs. Lower rack into canner and put lid on canner. Return canner to rolling boil. Once boiling again, leave the jars in for 10 minutes (you might need to adjust the time if you're at a different altitude).
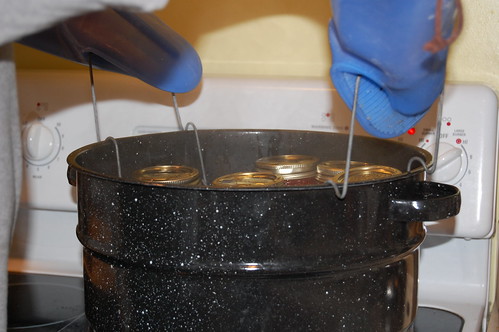
Raising the canner rack.
7. Carefully (we use orkas, those silicone mitts after learning the hard way that hot wet cloth oven mitts really really suck...) raise the canning rack. Remove the jars one by one using those jar tongs, and place them on the counter on top of a dish cloth (careful...they're hot so don't damage your counter). Leave some space between them for air flow. They'll need to be able to cool gradually.
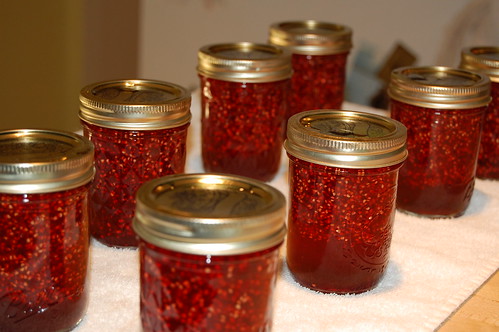
After some time (anywhere from a few minutes to over night) you'll hear them "ping", which means they are sealed properly. Just like a canned good you buy in the store, the lids will be concave when they are properly canned. The cooling forms a vaccum and 'sucks' the lids down, sealing them properly. You can check them all after a few hours to see if they are sealed--usually we tap the jar lid with the handle of a knife...they make a different noise from those that are unsealed...it's hard to explain (this is where canning with someone experienced if you've never canned before is a good thing)...but if you're ever not sure, stick that jar in the fridge and eat it over the next few days....just to be safe.
After the jars have cooled, label them with date and contents. Store your jam in a cool, dark place (dark basements work well for this) unitl ready to consume. The USDA and the National Center for Home Food Preservation has great guidelines on how long your canned goods can be kept safely, too.
My parents came up for the 4th of July, and they were kind enough to lend their berry-picking expertise. We got, I would guess about 3 cups (or more) on Saturday with them. Then, today, S. and I went back out and picked some more. Now we had 3 large tupperware containers full of Wineberries (and one black raspberry). What to do what to do....well, we were originally going to make a pie or a tart but now we had way too many berries for that...so we settled on jam. (turns out we only used about half of the berries up for that too...since we could only find one box of pectin..)
Wineberries from our yard.
We used the recipe in the package of pectin (as good as any) for "Blackberry, Boysenberry, Dewberry, Loganberry, Raspberry or Youngberry" jam, but there are copious notes and additional steps and edits, added in by yours truly. So really you can consider these steps based on the original recipe, but expanded upon considerably:
Approx. Yield: 8, 8-ounce jars--and we actually did get exactly 8 jelly jars full...but consider yourself warned that regardless of recipe specifications we always make sure there are plenty of extra clean jars on hand, just in case....
Ingredients:
8 cups crushed berries (2 quarts)
7 cups sugar
1 box pectin
1. Prepare boiling water canner, jars and lids
(We usually run our jars through the dishwasher ahead of time and have them at the ready. Most people recommend sterilizing your jars, bands, and lids ahead of time. Inspect your jar bands for rust and dents, and only use non-flawed and never-before-used dome lids. Caution: Always follow all instructions for safety that came with your jars, your lids, and your canner. You should only use a USDA recommended canning recipe. Use any canning recipe at your own risk, and if unsure, caqll an experienced canner or your cooperative extension for help. We usually begin our water bath canner boiling at this time now too, since it takes so long to get a rolling boil.)
Crushed wineberries.
2. Place prepared (crushed berries) in a 6 or 8 quart stockpot (Consider yourself warned that we almost ALWAYS have our jam boil over or splash and it's hard to get the sticky stuff off the stove after it's cool) Do not complete the next step unless your canner is near to boiling. At this stage things can go very quickly and it's better to not have full jars waiting to be canned while you wait for it to reach a boil....this is speaking from experience.
Wineberries and pectin in pot on stove (not sure why the foam here is orange....).
3. Gradually stir in pectin and bring mixture to a full boil over light heat, stirring constantly (be careful of splashes and bubbles---it gets really hot!)
4. Add sugar, stirring to dissolve. Return mixture to full rolling boil. Boil hard for 1 minute (it WILL foam....don't get burned--be careful), stirring constantly. Remove from heat, skim off foam if there's a ton of it, otherwise let it be.
Here are the jars, before we filled them
5. Ladle into jars, one at a time. Leave 1/4 inch headspace. Be sure to run a hot, damp paper towel around the rim after filling the jars. That will get the excess jam off and make sure that the lids seal properly. Then place the dome lids on top and screw on the bands to finger tight. Thump the bottoms of the jars lightly on the counter to get out extra bubbles.
Putting the jars in the canner.
6. Place jars carefully into canning rack (in canner) using jar tongs. Lower rack into canner and put lid on canner. Return canner to rolling boil. Once boiling again, leave the jars in for 10 minutes (you might need to adjust the time if you're at a different altitude).
Raising the canner rack.
7. Carefully (we use orkas, those silicone mitts after learning the hard way that hot wet cloth oven mitts really really suck...) raise the canning rack. Remove the jars one by one using those jar tongs, and place them on the counter on top of a dish cloth (careful...they're hot so don't damage your counter). Leave some space between them for air flow. They'll need to be able to cool gradually.
Here are our finished jars, cooling.
After some time (anywhere from a few minutes to over night) you'll hear them "ping", which means they are sealed properly. Just like a canned good you buy in the store, the lids will be concave when they are properly canned. The cooling forms a vaccum and 'sucks' the lids down, sealing them properly. You can check them all after a few hours to see if they are sealed--usually we tap the jar lid with the handle of a knife...they make a different noise from those that are unsealed...it's hard to explain (this is where canning with someone experienced if you've never canned before is a good thing)...but if you're ever not sure, stick that jar in the fridge and eat it over the next few days....just to be safe.
After the jars have cooled, label them with date and contents. Store your jam in a cool, dark place (dark basements work well for this) unitl ready to consume. The USDA and the National Center for Home Food Preservation has great guidelines on how long your canned goods can be kept safely, too.